From fashion photography to wedding shoots, the dreamy bokeh effect has been a popular trend in photography. The term “bokeh” comes from a Japanese word “boke” that means blur or haze. In photography, it refers to the aesthetic quality of the out-of-focus areas in an image. Although traditionally achieved through specific camera and lens settings, with Adobe Photoshop, you can add or enhance the bokeh effect in your images during post-processing.
In this tutorial, we’ll walk you through the steps to create a beautiful bokeh effect in Adobe Photoshop. Let’s get started!
1. Open Your Image:
Start by opening the image you want to edit in Photoshop. Choose a photo with some clear foreground and background separation for the best results.
2. Duplicate Your Layer:
Before we start editing, duplicate your image layer (Layer > Duplicate Layer). This way, your original image stays intact and you can easily compare the before and after.
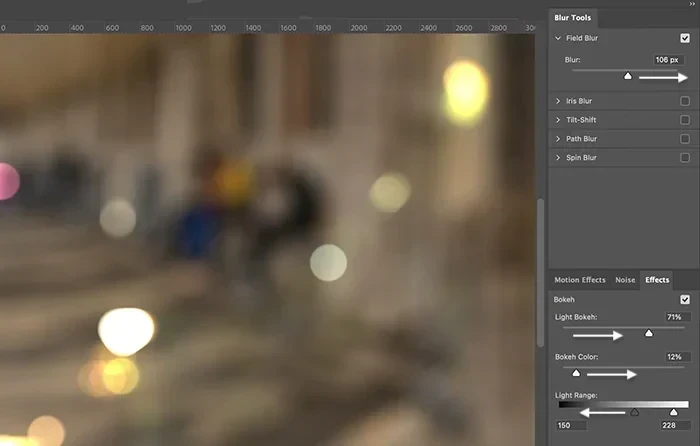
3. Blur the Background:
Next, go to Filter > Blur Gallery > Field Blur. A pin will appear on your image. Place it on the part of the image you want to stay in focus. Then, add a second pin on the background. Adjust the blur on the second pin to create a depth-of-field effect. Click OK when you’re happy with the result.
4. Create a Bokeh Brush:
To make the bokeh effect, we’ll create a custom brush. Create a new document (File > New) and use the Ellipse tool (U) to draw a small circle. Go to Edit > Define Brush Preset, give your brush a name (like “Bokeh Brush”), and click OK.
5. Paint the Bokeh:
Go back to your image and create a new layer (Layer > New > Layer). Select the Brush tool (B) and pick your new Bokeh Brush from the brushes panel. In the Brush Settings (Window > Brush Settings), increase the size jitter and scattering to make your bokeh more random. Set the color to white and start painting bokeh onto your new layer.
6. Add Colors to the Bokeh:
To make the bokeh look more realistic, we’ll add some colors. Go to Filter > Blur Gallery > Field Blur. In the Effects panel, increase the Light Bokeh and adjust the color sliders until you get the look you want.
7. Final Touches:
Finally, adjust the opacity of your bokeh layer to blend it in with the background. You can also add a layer mask and softly erase some bokeh from areas where it looks too intense.
And there you have it! With a few simple steps, you’ve added a dreamy bokeh effect to your photo in Photoshop. Don’t be afraid to experiment with different settings and colors to create a unique look for each image.
This tutorial not only teaches you how to add bokeh in post-production but also encourages you to think more about depth-of-field when shooting your photos. Mastering the use of bokeh can elevate your images from ordinary to extraordinary, providing an enhanced aesthetic experience to your viewers. Whether you’re a professional photographer or a hobbyist, the ability to add and manipulate bokeh is a valuable skill to add to your post-processing arsenal.
Remember, the power of Adobe Photoshop lies in your creativity. So, let your imagination run wild, and create something extraordinary!
Happy editing!
0 Comment